End User Resources
Main Navigation
- Home
- Awareness
-
Contact Us
Information Security
Office of Information Technology
1000 Faner Drive Mail Code 6535
Faner Hall
Carbondale, Illinois 62901
Fax: 618-453-5261
security@siu.edu


Main Content
This page is a general overview of the installation and operation of the free Comodo Backup utility
Comodo Backup: The Basics
One of the critical security issues that many users tend to gloss over is creating back-ups of their important data. All too often, crucial files can become corrupted or destroyed and a suitable backup is not present to easily help you replace lost or damaged files. Comodo Backup is a great way to easily backup any type of data to a variety of locations, including USB drives and network drives. It also includes an easy to use scheduling tool to automate your backup process.
As usual, we recommend downloading the program only from a known good source. In this case, we recommend that you download the program directly from the Comodo website. When you’re ready to download the installation file, go ahead and save it to your desktop for now.
Once you’ve downloaded the file (and scanned it with Anti-Virus software,) simply double click it to start the installation. The installation process is extremely painless: just click the “next” button until the install is finished. Once Comodo Backup has finished installing, a computer restart is needed before you can start using the program.
Before we begin using the program, you should know that if you’re planning to save your backup to an external hard drive or jump drive, Windows assigns the next free drive letter to your USB device. This means that if you have a backup set to backup files to your external hard drive when it was drive letter “E” and you’ve forgotten that you left a thumb drive plugged into your computer(which is now using the letter “E”) then Windows may not be able to assign the drive letter that you used when creating the backup job, because it’s already in use.
You can manually assign a drive letter of your choice to your external hard drive so that it will always have the same drive letter that you expect it to have when performing backups. For example, you might want to assign the drive that you store all your backups on as drive letter R: (for recovery). This needs to be done before you create the backup job within Comodo.
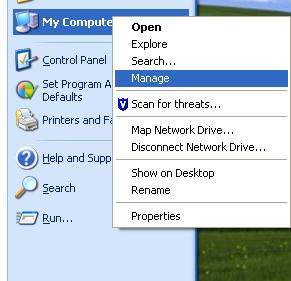
To assign a specific drive letter you first need to connect the USB drive that you want to store your backups on. Then, after you see that windows has completed installing the device driver and assigning it a temporary drive letter, right-click “My Computer” and select “Manage.”
In the new “Computer Management” window that opens, click on “Disk Management”

Find the drive you would like to change in the bottom menu, right-click on it and select “Change Drive Letter and Paths”
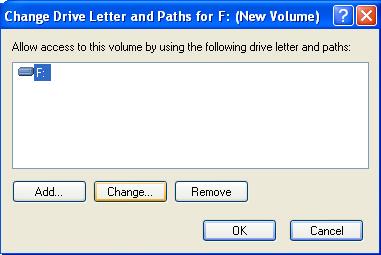
When you get a new window that looks like this, select the “Change” button.
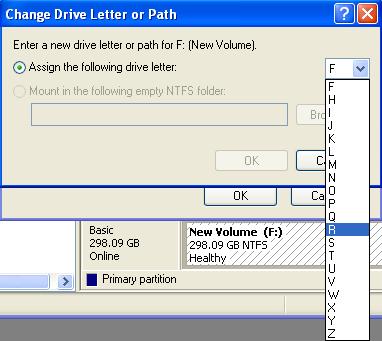
Finally, pick the letter that you’d like to have the drive use each time that it is connected from the drop down menu. Confirm your choice by clicking the “OK” button.
That was pretty easy, wasn’t it? Ok then, back to the Comodo tutorial.
This is the main Comodo Backup screen:

To start a new backup project, click the “New Backup” button in the top left-hand corner:
![]()
That should take you to a screen like this:
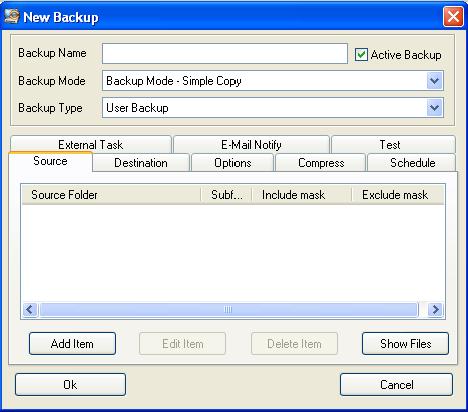
I know it looks daunting with all the tabs, buttons, and drop down menus; but setting up a new backup is relatively hassle-free. You’ll want to start by giving your backup a name. Enter it here:
![]()
Next you’ll pick what type of backup you want to do.
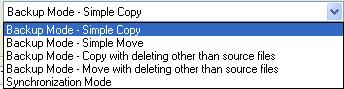
“Simple Copy” is, obviously, the most simple. “Copy with deleting other than source files” copies your specified files and deletes any outdated files in the destination folder. “Simple move” and “Move with deleting other than source files” are similar to their “copy” counterparts, but simply move the files to a new location as opposed to copying them. “Synchronization mode” eliminates the need for a scheduled backup by automatically copying any files in the source location to the destination folder any time the files are changed. For the most part, the “simple copy” option will be sufficient for your needs. Leave the backup type as “User Backup.” Also, make sure the “Active Backup” checkbox is checked.
Now you’ll need to choose the folder you’d like to copy. Make sure the “Source” tab is selected, and click on the “Add Item” button. You should get a drop down menu like the one below:
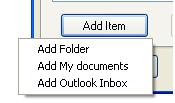
Besides searching for the specific folder, Comodo gives you a couple quick options: exporting everything in the My Documents folder and exporting Microsoft Outlook’s inbox. If the files you’re wanting to copy aren’t in your My Documents folder or Outlook’s inbox, click on “Add folder.” You will we transported to this screen:
Click the browse button to search for the folder you want to copy:
![]()
Or, if you know the folder’s file path, you can enter it manually. Don’t worry about any of the other checkboxes or options; those are advanced settings that can be read about in the program’s Help tutorial.
Once you’ve picked a folder to copy, it’s time to pick its destination. Click the “Destination” tab on the New Backup screen.
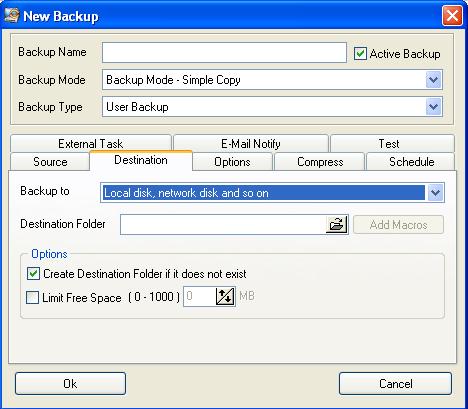
Here you’ll be able to select if you’re going to back your files up to a local or networked disc, FTP server, or CD/DVD. Choose your option here:

Most of you will be backing up to an internal or external hard drive, and therefore you will be picking the first option. After picking the type of media you’ll be saving your backup to, you’ll need to select the folder Comodo will copy the files to. Click the browse button to search for an already created folder, or create a new folder by manually entering the file path into the “Destination Folder” text box. If you are creating a new folder in this manner, make sure the “Create destination folder if it does not exist” checkbox is checked. You can also automatically add the date and time the backup was made to the folder name by clicking the “Add Macros” button.
After selecting the destination folder and clicking “OK,” your backup should appear on the main screen, looking something like this:
![]()
At this point, your backup is finished and ready to be started. However, there are a few more things you can play with to tweak your backup. Select your backup and click the “Edit Backup” button:
![]()
You’ll be shown the same screen as when you first started your backup. Click the “Options” tab.

If you’re doing a relatively small backup, it’s recommended you select the “Full Backup” option. This will copy all files, regardless of whether or not they’ve been changed. If your backup is quite large, select “Incremental Backup” to only copy files that have been changed. You can also choose to stop any backups that encounter errors on this screen. If you are backing up large files (like your music library), you may want to compress the backup. To do this, click the “Compress” tab:
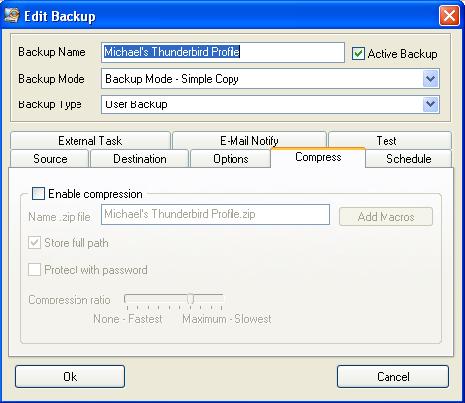
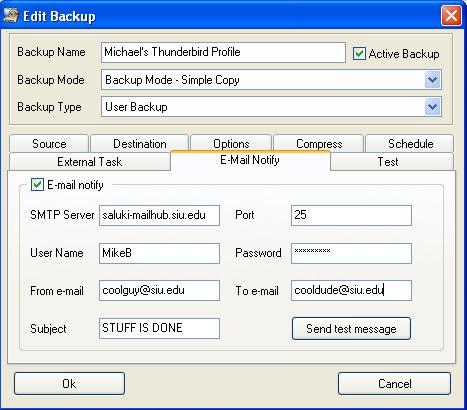
Your folder will automatically be compressed into a .zip folder, and you can configure a password for it. The compression ratio is also configurable. It should be noted, though, that users using older machines utilizing the FAT32 file system may encounter errors if their compressed file exceeds 2 GB. Another helpful tool when you’re backing up a large file is a notification when it’s done. To have Comodo send you an email when your backup has completed, click the “Email Notify” tab and fill out the corresponding information:
Once you’ve configured your backup to your liking, it’s time to start it. To begin the backup, select your project and click the “Run Backup” button:
![]()
While your backup is running, you can track its progress in the progress bar at the top of the screen. You can also check the log file to make sure all files were successfully copied. Red text indicates an error:

Assuming your backup completes successfully, that’s all there is to it! The Security Team highly recommends the creation of backups for any critical or sensitive files, as well as anything you’d miss if it was lost in a system crash (music, pictures, etc.). If you’d like to learn more, the following sections detail how to schedule automated backups, and how to create an extra copy of your Thunderbird email profile.
Comodo Backup: Scheduling Automated Backups
One useful feature of Comodo Backup is its scheduling ability. This allows you to set the program up to backup important files at certain times and forget about it. It takes care of all the work for you. To do this, select the backup you want to automate and click the “Edit Backup” button. Then navigate to the “Schedule” tab:
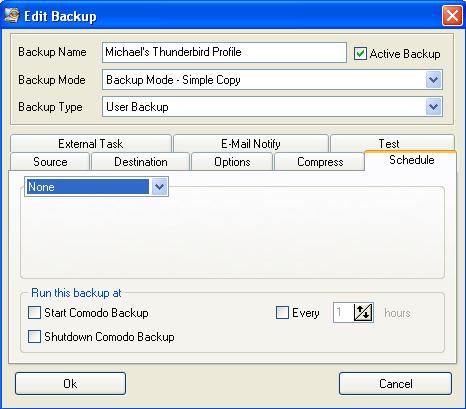
You have several choices to schedule your backup by: hourly, daily, weekly, monthly, or every time Comodo starts or shuts down. To schedule a daily, weekly, or monthly backup, click the drop down box and pick your selected backup period. Hourly and startup/shutdown backups are even easier to configure: simply click the corresponding checkboxes at the bottom of the screen. 2nd grade wasn’t even this easy. You can utilize this feature to allow backups to run consecutively overnight, allowing for a full backup without taking up processing power away from other programs. Personally, this is how I would go about backing up my files.
If you’re constantly working on important files, and don’t want to have to worry about actually taking the time to back them up, scheduled backups are a great idea. At the selected time, Comodo compares the original files to the backup, and copies anything that’s changed. Even if you’re not repeatedly revising a file, automation is a good way to keep backing up files hassle-free.
Comodo Backup: Backing Up Thunderbird Profiles
Mozilla Thunderbird is a free email client from the makers of the Firefox web browser. It comes highly recommended over alternatives like Outlook because of its security and simplicity. Thunderbird stores all your personal settings, like your mail and password, in a profile. As you can imagine, it’s handy to have a backup of this profile, just in case any problems arise. The problem is, the profile itself is a little tricky to locate. Open up the Start Menu, and click on the “Run” button:
![]()
Next, enter the following file path: C:\Documents and Settings\[User name]\Application Data\Thunderbird\Profilesand hit “Enter.” This is assuming C: is where you’ve saved the Thunderbird application. You will be taken to a screen like this:

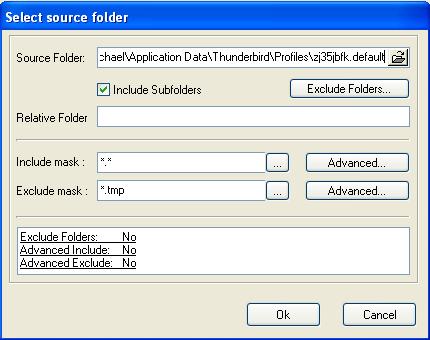
That oddly named folder contains all your personal email settings, including your mail. To create a backup of it, you have to manually enter the file path in the “Source Folder” box in Comodo Backup. You cannot browse to it and select it. Here’s what your backup source should look like:
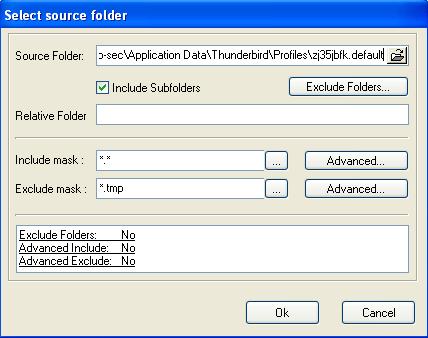
Note that you must include the folder name in order for the folder to copy properly.
The following is a list of common applications and the file path to their user data. It’s wise to backup any personal settings for important applications:
Firefox - C:\Documents and Settings\[User name]\Application Data\Mozilla\Firefox\Profiles
Opera - C:\Documents and Settings\[User name]\Application Data\Opera\Opera
Chrome - C:\Documents and Settings\[User name]\Local Settings\Application Data\Google\Chrome\User Data
Safari - C:\Documents and settings\[User name]\Application Data\Apple Computer\Safari
Internet Explorer Favorites (XP) - C:\Documents and Settings\[User name]\Favorites
Internet Explorer Favorites (Vista) - C:\Users\[User name]\Favorites
Eudora - C:\Documents and Settings\[User name]\Application Data\Qualcomm\Eudora
MS Outlook 2003 - C:\Documents and Settings\[User name]\Application Data\Microsoft\Office\Outlook
MS Outlook 2007 - C:\Documents and Settings\[User name]\Local Settings\Application Data\Microsoft\Office\Outlook
MS Outlook Express 6.x - C:\Documents and Settings\[User name]\Application Data\Microsoft\Outlook
Palm Desktop 4.x - C:\Program Files\Palm OR C:\Program Files\palmOne OR C:\Program Files\Handspring
Palm Desktop 6.x (XP) - C:\Documents and Settings\[User name]\My Documents\Palm OS Desktop
Palm Desktop 6.x (Vista) - C:\Users\[User name]\Documents\Palm OS Desktop
iTunes (Music) - C:\Documents and Settings\[User name]\My Documents\My Music
iTunes (Preferences and settings) - C:\Documents and Settings\[User name]\Application Data\Apple Computer\iTunes
Songbird - C:\Documents and Settings\[User name]\Application Data\Songbird2
MediaMonkey - C:\Program Files\MediaMonkey\Data
"Desktop" (XP) - C:\Documents and Settings\[User name]\Desktop
"Desktop" (Vista) - C:\Users\[User name]\Desktop
You should now be a backup pro. Copying files to different locations is now a menial task for you. Automating backups is second nature to you now. You think about backing up your email profile in your sleep. Well, maybe actually none of those things. But the point is, creating backups of critical files is an extremely beneficial practice to get into. Having an extra copy of all your schoolwork on hand is very useful when the original files are accidentally damaged. And Comodo Backup makes the entire backing up process very, very easy.